Downloading Enterprise Edition of Windows
Getting hold of a Windows ISO is as simple as downloading anything these days but only users of the early 2000s would remember how risky this was back in the day. I still remember the day when I got my first PC and the guy who built it installed a genuine copy of Windows, that was in fact a pirated version. Totally clean copies were totally alien to the average Joe. The misery of it all was when or if the PC gets a random virus or if there is a need to do a clean install. Where do you get an iso image? Our hope remained on torrent websites or if you surf deep through the forums to get one posted by a trust me bro source.
Today things are much different, and so are the software that we use. Operating systems are made available to download from the people who make them, which makes for a very safe start. Only thing you need to purchase is a license key. Additionally, we all live in an age of telemetry and snooping by big tech. Linux and Open Source alternatives have witnessed mass adoption compared to previous years. On Microsoft side, there has been some interest shown towards variants like LTSC and Enterprise editions, neither of which was created for a home user in mind. In this post, I will show you a simple way to get hold of Windows Enterprise Edition ISO, straight from Microsoft!
At the time of writing, Microsoft just released 26H2 version of Windows 11 a couple of weeks ago. While explaining the steps, it is assumed that you are on a Windows PC with an internet connection and administrative rights.
- These days Windows images are downloaded with the help of the latest Media Creation Tool. You need to download this tool from Microsoft Page. A simple Google search for latest Windows iso should direct you there.
- Visit Microsoft’s Windows 11 download page and choose “Create Windows 11 Installation Media” and then click, Download now.
- Save MediaCreationTool.exe to a local folder in your computer.
- Once downloaded, open the folder and inside open an elevated shell in the same folder. You can do this by pressing down the SHIFT key and right click to open the menu (see image below). Alternatively, click the path/address bar (or press ALT+D) and type PowerShell then press Enter to open a PowerShell instance scoped to that folder.
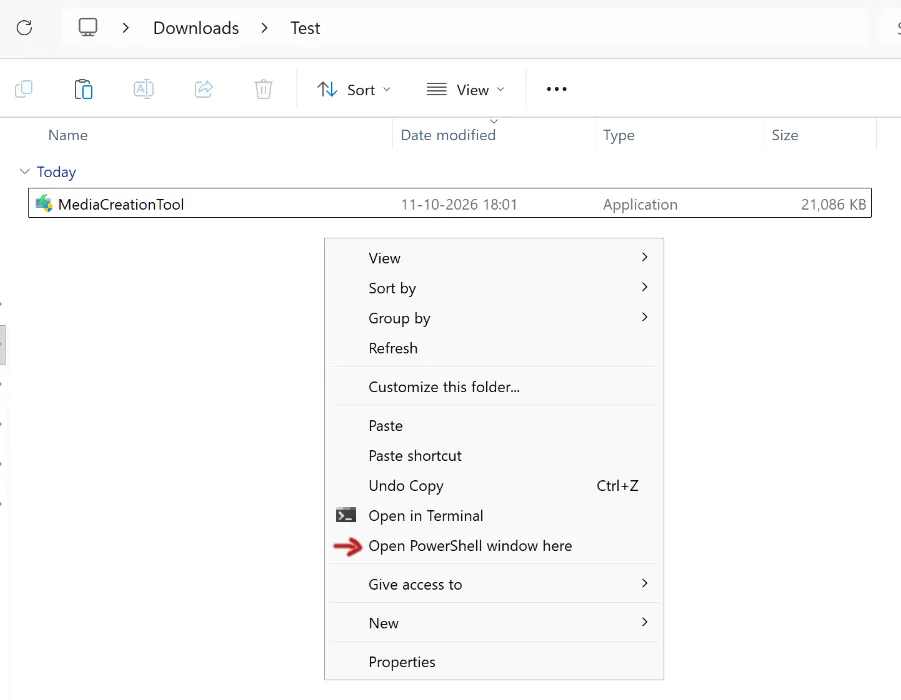
- Once the shell opens up, run the Enterprise download command as given below,
.\MediaCreationTool.exe /Eula Accept /MediaLangCode en-US /Retail /MediaArch x64 /MediaEdition Enterprise
If you need an ARM image, the command would look like this,
.\MediaCreationTool.exe /Eula Accept /MediaLangCode en-US /Retail /MediaArch arm64 /MediaEdition Enterprise
- What does the above command mean? Read below,
- /Eula Accept — pre-accepts the tool’s EULA to allow unattended execution.
- /Retail — instructs the tool to download retail media (affects SKU packaging).
- /MediaArch x64 — selects the 64-bit architecture.
- /MediaLangCode en-US — specifies the language pack to include.
- /MediaEdition Enterprise — instructs the tool to compose an Enterprise (multi-edition) ISO.
- Once the above command is pasted, press ENTER. This should trigger a prompt for you to install a product key. Here, you can just give a generic product key given below and the installer should proceed.
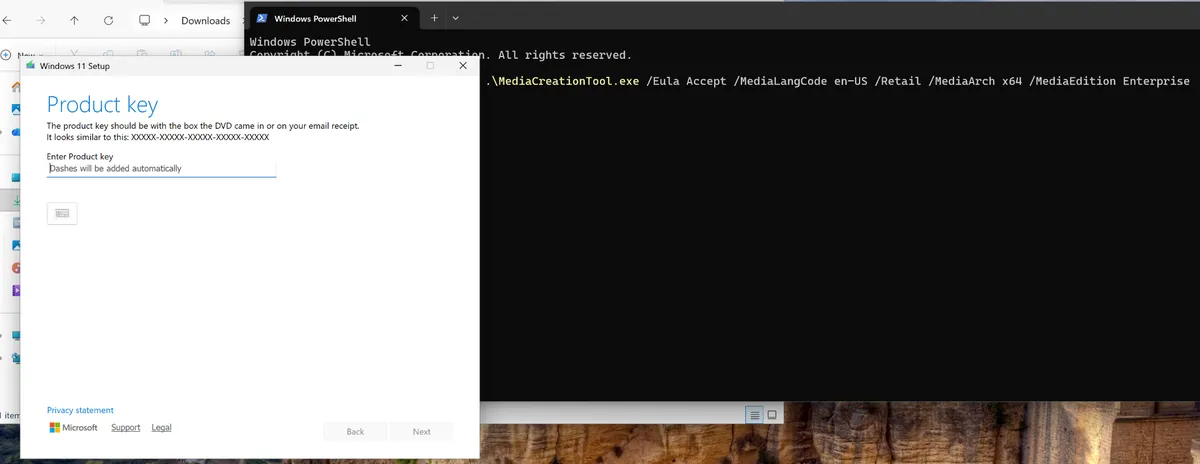
GENERIC KEY: NPPR9-FWDCX-D2C8J-H872K-2YT43
- Next, the installer would ask you if you want to download the image as an ISO or create a bootable media USB. Choose ISO and then give it a location to save it.
That is all you need to do. I think Microsoft deserves credit for letting public have direct access to its ISOs. At a time when more people are getting online, having a secure Operating System is vital. I hope this post was useful to you.
Thank you for visiting and have a good day.
DISCLAIMER: I am not a tech journalist of any kind. I was struggling to get rid of my writer's block to work on my personal blog and I thought why not make a tech post. The above was written by myself and I did not use AI Tools of any kind.